PRO004 - Home Battery DYI
Step for step - Step 1
What steps?
Before buying battery, charger and other components, better to check a few things. There are two thing I have in mind:
- Sending and receiving power consumption inforation.
- The home battery needs to know when it is OK to charge or to discharge. So I need information about the net consumption in my house.
- Switching between net and battery power.
- Can I switch without the consumers knowing that their powersource has changed?
1. Consumption information
The solar panels on the roof are connected to Envoy inverters of Enphase. I think there are at least three ways to get the solar productionor total consumption data of my house to an ESP. Ordered by preference:
- Through the HomeAssistant (HA) application on my RasPi.
- The API of Enphase.
- Through one of the physical ports of the smart meter.
the HomeAssistant app is capable of automatically detecting the Enphase Envoy and integrate it. The figure below shows all the information that is readily available.
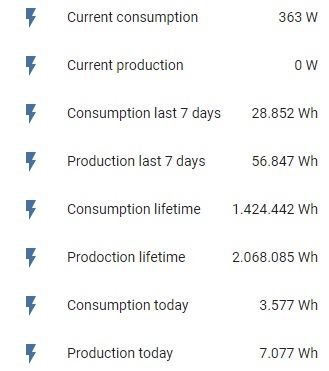
Which is all the info I need! I am planning to send the data to my eSP using the MQTT protocol. For this to work I made the Pi running my HomeAssistant the mqtt broker, which I did following this RandomNerd tutorial. If you add the following lines to the configuration.yaml file of your HA:
            mqtt:
              broker: *IP_of_mqtt_server*
              username: *UserName*
              password: *Password*
Rebooting the HomeAssistant server should make MQTT available in the integrations.
Getting the information of the solar panels in HA is one thing, now we need to get this information on the EPS8266. Action is needed on the HA side and on the ESP side:
HomeAssistant side
You can configure the HA to send mqtt messages by going to Settings > Automations and adding a new automation. Most information you need is available though links on the settings page. Give t a name, a description. I Used a que of 10 and for a Trigger I chose a Time patternto automatically send the message each time the, the hour, minutes or secconds of the actual time match the value you place. I send it once a minute, which you can do by specifying for example "30" in the secconds field, or "/1" in the minute field.
Then the Action to be taken at each trigger point we want to call a Service, more specifically mqtt:publish. Then you can choose the name of the topic and define the payload. The latter is what I struggles with the most, but what you can see below is what worked for me:
            service: mqtt.publish
            data:
              topic: ConsumptionData
              retain: false
              payload: '{{(states("sensor.envoy_xxxxxxxxxxxx_current_energy_consumption")|int)}}'
saving and possible restarting your HA server should result in a automations.yaml looking like the file below:
          - id: 'xxxxxxxxxxxxx'
            alias: SendUpdatedConsumption
            description: Send a message over mqtt if the consumption value changes
            trigger:
            - platform: time_pattern
              seconds: '30'
            condition: []
            action:
            - service: mqtt.publish
              data:
                topic: ConsumptionData
                retain: false
                payload: '{{(states("sensor.envoy_xxxxxxxxxxxx_current_energy_consumption")|int)}}'
            mode: queued
            max: 10
eSP8266 side
Now that the HA is configured to send the message via mqtt, let's set up the ESP to receive it. Everything on the ESP side I was able to easily reproduce from this Instructables by [ Tomas Varnish ], and the files available there.
Well, this was a very short section... If it isn't as straight forward on the ESP side as I made it look, feel free to shout and let me know and I'll see where I can help.
Next time, I'll quickly look if it is possible to switch between net- and battery power without confusing the loads attached to the output, before starting on the full software framework.
Project overview:
| Project Requirements | August 4th 2021 |
| Step for step - Step 1 | November 20th 2021 |